I don't know about all of you, but whenever I plan to make fish, I never think about making a fish sandwich. I'm not really sure why that is, but we had some leftover buns that I wanted to use up and everything just feel into place after that. This fish sandwich is a little on the lighter side because it doesn't have a beer batter coating and it's not fried. So, you still get that crunchy coating, but since it's baked, you don't have to worry about all the oil. Here's what I did...
-tilapia fillets (or any other flaky, white fish. Allow 1 per sandwich. Try to make sure they are all the same size so that they will cook evenly.)
-about 1 cup of panko bread crumbs (It's a Japanese style bread crumb and can be found in the asian aisle at the grocery store. This amount covered 2 fillets, so add more as needed, along with the spices, zest and butter.)
-1/2 cup of flour
-2 eggs
-a rounded TBS of Old Bay Seasoning
-the zest of 1 large lemon (after zesting, cut the lemon into wedges and reserve)
-a small handful of parsley, finely chopped
-1 TBS of butter, melted (it helps to brown the panko bread crumbs in the oven)
-rolls/buns of your choice
-lettuce leaves and sliced tomatoes (optional)
Preheat the oven to 350 degrees. Set up your breading station. In the first bowl, add the flour. In the second bowl, beat the eggs. In the third bowl, combine the panko bread crumbs, Old Bay seasoning, lemon zest, parsley and melted butter. Toss with your hands to distribute everything evenly. Dab the fish dry with a paper towel, then dredge in the flour and shake off the excess. Dip the fish into the egg, then into the panko mixture. Press the fish firmly in to the panko to ensure that it sticks to the fish. Place the fish on a cooling rack set over a cookie sheet. Repeat until all the fish is breaded. Allow the fish to sit for 5-10 minutes to give the breading time to dry out a little, so that it sticks to the fish better. Place the fish in the oven and cook for 10-12 minutes. (If the the fish is thicker than 1/2 inch thick then add a few more minutes to the cooking time.) When the fish comes out of the oven, squeeze the reserved lemon over the top of each fish.
Tartar Sauce:
-1 small container of plain greek yogurt
-1 TBS mayo or Miracle Whip
-5 to 6 large pickle slices, finely diced (you can use pickle relish, but I find it a little too wet.)
-the juice of half a lemon
-1 tsp dry ground mustard
-1/2 tsp onion powder
-1/2 tsp celery seed
-salt and pepper to taste
Combine all the ingredients in a small bowl and mix well.
I make the Tartar Sauce before breading the fish so that the flavors of the sauce can sit and marinate together. This tartar sauce is an alternative to the sour cream and mayo based tartar sauces that are more traditional. I hope you will give this one a try because it is quite flavorful and you can't tell that you're eating yogurt instead of sour cream.
To serve the fish sandwiches, toast the rolls if desired. Place the fish on the bottom bun and top it with the tomato and lettuce. Smear a generous amount of tartar sauce on the top bun to finish the sandwich.
Even through the bun, you can feel the crunch of the coating on the fish and the spices and lemon zest add a spicy and tangy kick. This crispy fish would be just as good to eat by itself instead of a sandwich. Enjoy!
I have finally solved a problem I had been having with my chicken roll-ups. Before, I would cut one chicken breast in half horizontally (because chicken boobs are so big nowadays!) and try to make roll-ups out of those two pieces. Inevitably, I would have a hole in one of the chicken pieces. Frustration would set in. But I have found a solution! Ready? Use 2 chicken breasts!! I know, I'm a genius. Even though using 2 chicken breasts is a whole lot of meat, it is just so much easier to handle. And if there's leftovers, who cares? Just have them for lunch the next day. I don't know why I was stressin' over extra chicken. Silly. Anyway, here's what I did...
-2 chicken breasts (or one per person)
-1 bunch of asparagus (To remove the woody ends of the asparagus, hold one by both ends. Slowly move your hands closer together and let the asparagus naturally break. Discard the end. Then line up that asparagus with the rest of the bunch and cut the rest of them that length.)
-3 oz prosciutto (it's a type of dry-cured ham. Although you can use regular ham, I highly recommend trying this. It just lends a salty depth of flavor that is really different from regular ham.)
-sliced provolone cheese
-1/2 cup of balsamic vinegar
-1 TBS of brown sugar
-1 acorn squash, halved and seeds removed
Preheat the oven to 350.
Place acorn squash cut side down onto a cookie sheet. Place it in the oven and cook for 40-45 minutes. Meanwhile, remove any fat from the chicken, then place the chicken breast between 2 pieces of plastic wrap. Take a meat mallet (use the smooth side), rolling pin or heavy bottomed skillet and evenly pound the chicken out until it's about 1/2 inch thick. Repeat for all the chicken breasts. Next, salt and pepper both sides of the chicken. Then take a piece of cheese and place a piece of prosciutto on top. Next, add about 5 thin asparagus spears (or 3 thicker ones) on top of the prosciutto. Roll the asparagus spears, prosciutto and provolone cheese into a little bundle. Place the cheese bundle onto the smallest end of the chicken and roll towards the big end. Secure the seam with toothpicks. Repeat until all of your cheese bundles are rolled into your chicken breasts. In a saute pan, over medium heat, add 1 TBS of extra virgin olive oil. Without crowding, brown the outside of the chicken breasts, 2-3 minutes per side. Transfer to a cooling rack set over a cookie sheet. Once all of the chicken breasts are browned and are on the cookie sheet, place it in the oven and cook for 20-25 minutes or until the chicken juices run clear. While the chicken is cooking in the oven, combine the balsamic vinegar and brown sugar in a small sauce pot. Bring to a simmer over medium heat and let simmer for about 10 minutes or until slightly thickened. (Make sure to have your ventilation fan on above the stove as the vinegar can be pretty pungent as it simmers.) To serve, place the chicken breast on a plate and drizzle with the balsamic glaze. For the squash, add butter, brown sugar and cinnamon in desired amounts.
This meal was very good. I loved the combination of flavors in the chicken. The asparagus was still crisp and green and the flavors of the prosciutto and cheese melted together to create a rich, deep flavor. And the ends of the prosciutto that were sticking out of the chicken were crispy and salty. There was a lot of flavor and texture going on in that moist chicken breast. :)
I was so happy that I finally found a way to do this because chicken roll-ups can be a lot of fun. You can put anything in the chicken breast. They always say that chicken is a blank canvas and it really is. It goes with everything. I'm planning a chicken roll-up dish next week that will have sort of a spinach-artichoke dip in the middle. There are endless possibilities. I'd love to hear any flavor combinations that you come up with! :) Enjoy!
OK, after this recipe, I will try not to post any Mexican recipes for awhile. I can't promise that I won't, but I will try. :) I know you want variety and I want to have variety on my blog, but this recipe was just too good not to post. Plus, it's a great recipe to have if you're having a party since taquitos can be served at room temperature after frying. I've also been wanting to put my Spanish Rice recipe on here for awhile. I came up with my Spanish rice recipe in a funny way. A friend of my family's always made the best Spanish rice and we would always ask for the recipe. Finally, she told us. It was from a packet! It was the Knorr brand Spanish rice. We all had a good laugh and we started using that packet. But one day, I thought "How hard could it be to make Spanish rice?" And it really wasn't that hard. I really beefed it up though, by adding....well, you'll see! :) Here's what I did...
For the tacos, I had previously frozen some of my Sweet and Spicy Pork, (under my blog archives click on August and scroll to the bottom to find the recipe) so I just thawed that to use for the filling. But you can use whatever shredded meat you have, shredded beef, chicken or pork.
You will also need:
-corn tortillas
-1/3 cup of cream cheese
-1 TBS diced jalapeno
-1 small cartoon of plain greek yogurt
-1/2 tsp of smoked paprika
-a small handful of cilantro, chopped
-a good pinch of salt
In a small bowl, add the yogurt, smoked paprika, cilantro and salt. Stir to combine. Place in refrigerator until everything else is ready. (This is a great alternative to sour cream. Very tasty! We also made guacamole for our taquitos so go ahead and make that too if you want.) In another small bowl, add the diced jalapeno and cream cheese, whipping with a spoon until smooth and fluffy. To prep that taquitos, take a corn tortilla and smear a thin layer of the cream cheese mixture down the middle. Place the shredded meat on top, but not all the way to the ends. Roll the corn tortilla over the meat tightly. To seal the taquito, take a dab of cream cheese and smear it on the loose flap of tortilla, then finish rolling. Repeat process until you have reached the desired amount of taquitos. Preheat a cast iron skillet over medium high (about 6 if you have numbers on your stove dials) with about 1 inch of vegetable oil. (Or if you have a deep fryer, use that.) Fry taquitos for about 3 minutes per side. Make sure you don't crowd the pan or they won't cook evenly. Transfer to a paper towel-lined plate. Repeat until all taquitos are cooked. To serve, place taquitos on a plate and top with some of the yogurt mixture and guacamole.
For the rice:
-1 cup of long grain white rice (Don't use minute rice.)
-1 1/2 to 2 1/2 cups of water (the amount of water varies per rice package, so just follow the instructions on the back.)
-1 15oz can of diced tomatoes, drained
-1 small can of diced green chilies
-1/2 cup of frozen corn
-a handful of cilantro, chopped
-2 to 3 scallions, chopped
-1 TBS California chili powder (or regular chili powder)
-1 TBS paprika
-2 tsp ground coriander
-1 tsp onion powder
-pinch of salt
Bring water and spices (just eyeball the amounts for the spices) to a boil. Add in rice, reduce heat to low and cover. (This is the typical way to make rice, but if the instructions are different on the package, then just follow those.) Cook for about 15 minutes or until all the water is absorbed. (Again, the cooking time may vary, just follow the directions on the package.) When the rice is cooked, add the tomatoes, green chilies and corn and fluff with a fork. Right before serving, stir in the cilantro and scallions.
*Cook's Note: I actually prepped the taquitos first, then got the rice on while the cast iron skillet was heating up. The rice I have only takes 15 minutes to cook and you'll need that much time just to fry the taquitos. Just keep that in mind when you make this.
We don't eat fried food a lot, but there was something very satisfying about crunching into these pork taquitos. They were crunchy, sweet, and spicy. Just an all around great treat! I hope you enjoy them too!


 You're probably thinking that a lot of my recipes are for Mexican food, but in all honesty, Matt and I eat Mexican food probably about 3 or 4 times a week! Even tonight, I plan on making pork taquitos! Ha, ha! Needless to say, it's one of our favorite types of food. This recipe I thought was quite clever because it uses something we all have at one time or another...stale tortilla chips! I hate biting into a chip expecting it to be crisp and instead it has that brittle crunch to it. Yuck! But now, I will no longer throw away a stale bag of tortilla chips, instead I will make this! :) When you eat this, you can't even tell that the chips were stale. It's a great way to use old chips, but of course, you can use fresh chips, too. Here's what I did...
-tilapia fillets (one per person)
-1 and 1/2 cups of crushed tortilla chips (the easiest way to crush them is to put them in a plastic bag and seal it. Make sure to get all of the air out of the bag. Then take a rolling pin and run it over the bag in all directions until the chips are finely crushed.)
-2 limes, zested (after zesting, cut the limes into wedges and reserve.)
-1 cup of flour
-2 eggs
-1 TBS ancho chili powder (or any regular chili powder that you have on hand)
-1 TBS smoked paprika (or regular paprika)
-2 tsp ground coriander
-1 tsp onion powder
-a heavy pinch of salt
-a small handful of cilantro, chopped
The first thing to do is set up your breading station. You need 3 wide and shallow bowls. In the first one, add in the flour. In the second one, beat the eggs. In the third bowl, add the crushed tortilla chips, lime zest, spices (no need to measure exactly, just eyeball it), salt and cilantro. Toss to distribute the spices and zest evenly. (Anytime you bread something, this is how you should do it. First the flour, then egg, then breading. The flour sticks to the meat and helps the egg stick to the flour, which then helps the breading to stick to the egg.) Before you begin breading, take a paper towel and dab the fish dry. Take a piece of fish and coat it in a thin layer of flour and shake off the excess. Then run the fish through the egg and finally into the tortilla chip mixture. Press the fish firmly into the chip mixture to make sure it sticks well to the fish. Transfer to a plate or cookie sheet. Repeat the breading process until all of your fillets are breaded. Let the fillets sit for 5-10 minutes. This lets the breading dry out a little so that all the layers will stick together. Meanwhile, heat 2-3 TBS of olive oil in a saute pan over medium heat. Without crowding, fry the tilapia fillets about 3-4 minutes per side. When you flip the fish over to the second side, you may need to add a little more olive oil, you can be the judge of that. When the fillets come out of the pan, squeeze them with the reserved lime wedges. Serve with beans and spanish rice.
This is a good alternative to something wrapped in a tortilla. Don't get me wrong, I love me a good tortilla, but I thought I would change it up for ya! Oh, and if you don't like the flavor of tilapia, this will work with any other flaky white fish, but the cooking times will vary if it's any thicker than a tilapia fillet. Let me know what you think of it! Enjoy!


 This dish was inspired by my friend, Nicole who had stuffed mushrooms at Oregano's and wanted to know how to make them. I stuffed these with sausage and spinach, but you could do a meatless version and stuff the mushrooms with grilled veggies or artichoke hearts and spinach. In this post, I'm also including the recipe for my homemade spaghetti sauce, but you can, of course use jarred sauce if you prefer. Here's what I did....
Spaghetti sauce
-1/2 of a large sweet onion, diced
-4 roma tomatoes, diced
-2 to 3 garlic cloves, finely diced or grated on a microplane (AKA hand-held grater)
-1 small can of tomato paste (6oz)
-1/2 cup of red wine (I just use whatever I have open or one that I'm going to drink with dinner.)
-1 large can of tomato sauce (28oz)
-1/2 tsp of red pepper flakes (use less if you're sensitive to heat)
-1 tsp of dried oregano
-1 tsp dried basil
-7 to 8 leaves of fresh basil, sliced thinly
-a handful of flat leaf (Italian) parsley, chopped
In a large stock pot or sauce pot, heat 1 TBS of extra virgin olive oil over medium heat. Add in the onions and saute for 2-3 minutes until translucent, stirring frequently. Next add in the red pepper flakes, dried oregano and dried basil, rubbing them in your palm before adding them to the pot. (This releases more flavor.) Add the garlic (if using) and tomatoes and a heavy pinch of salt and saute until soft, stirring often, for 12-15 minutes. (You want to see a mash like consistency with the onions and tomatoes. So, after about 6 minutes, the tomatoes should be really soft and you can begin breaking them up with your wooden spoon.) After the tomatoes and onions have created a mash, add the entire can of tomato paste. Stir to combine with the tomatoes and onions and let the tomato paste cook for 2 minutes. Deglaze with the red wine and let the liquid cook out for 3-4 minutes. Next, add the tomato sauce, parsley and half of the fresh basil. Stir to combine. Once the sauce begins to bubble, reduce heat to simmer. Simmer for 45 minutes to 1 hour, stirring occasionally. Right before serving, add in remaining basil and salt and pepper to taste.
*Before starting the mushrooms, I put a pot of water on to bring up to a boil for the pasta.
Stuffed Mushrooms
-portobello mushrooms (allow 1 per person, try to get them all the same size, for even cooking. Remove stems by twisting them gently.)
-Italian pork sausage, any heat level you like (I had 2 Italian sausage links, (about 1/4 lb) which I removed the casing from and broke it up. This was enough meat for 3 mushrooms.
-1 small shallot, finely diced
-a handful of fresh spinach, sliced
-3 to 4 fresh basil leaves, thinly sliced
-a small handful of parsley, chopped
-1/4 cup of panko bread crumbs (they are Japanese style bread crumbs. If you can't find these, just use regular plain bread crumbs.)
-a generous handful of shredded or grated parmesan cheese, plus more for sprinkling
In a medium saute pan, heat up a 1/2 TBS of extra virgin olive oil, over medium heat. Break up the Italian sausage with your fingers and place into the pan. (If you used the sausage links, make sure to remove the casing, by cutting a slit down the sausage and peeling back the casing.) Let the meat brown on one side (about 4 minutes) before stirring it around. Add the shallots and cook for 3 minutes more. Deglaze the pan with a splash of chicken stock and let the liquid cook out. (If you don't already have some chicken stock open or on hand, omit this step.) Remove from the pan onto a plate lined with paper towel to catch any excess grease. In a bowl, combine the spinach, parsley, basil, panko, parmesan and meat. Salt and pepper to taste. Set aside. (Drop your pasta into the boiling water and cook 8-10 minutes or until desired tenderness.) With a paper towel, wipe out the saute pan and bring up to temperature over medium heat with 1 TBS of olive oil. Place 1-2 mushrooms, gill side up into the pan and cook for 3-4 minutes per side or until slightly softened. Repeat as needed until all the mushrooms have been cooked. Remove from pan and onto a cookie sheet. Preheat the broiler to high. Begin spooning the filling into the mushroom caps with an even amount of filling. Sprinkle the top with some parmesan cheese. Place under the broiler for 5-6 minutes or until cheese melts.
To serve, drain the pasta and return it to the pot. Add several ladles of sauce and stir to combine. Place pasta on a plate topping it with a stuffed mushroom. Drizzle the mushroom with some extra sauce if desired.
*I apologize for the lack of pictures of the sauce. I decided too late in the game that I wanted to put my sauce recipe on here. I will post more pictures when I make it again.
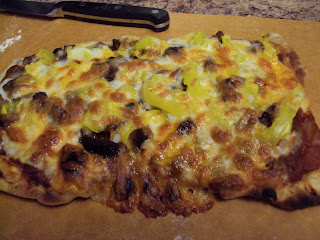 1. Philly Cheesesteak pizza with peppercini's
 2. Tomato, Kalamata olive and feta pizza
 3. Beef and Brie Pizza with caramelized onions and mushroomsThis is something that Matt and I have been doing for quite a while. I should warn you that once you make pizza this way, you won't want it any other way ever again. The outside of the dough gets crusty and the inside is chewy...a perfect combination. :) When we made this the other night, the only thing we had to buy was the pizza dough...for the toppings, we used leftovers! I love when you can use what you already have and this was a fun way to use up leftovers. I'm sure you've all made homemade pizzas before, so the only thing you really need to know here is about the grilling technique. And just a tip...it's a lot easier if you have all of your toppings chopped and ready to go beforehand, so that you're not scrambling to get them on the pizza before the crust burns. Here's what we did...
-pizza dough (I get it at Trader Joe's. The directions say to let it sit at room temp for about 20 minutes, but through trial and error, I've found it needs more like 40 minutes before it's easy to handle.)
-pizza sauce
-desired toppings
-outdoor grill or indoor grill pan
Roll out the dough on a floured surface, then split it into 4 sections. I find that the smaller pieces of dough are easier to handle on the grill. Plus, if you're having a party, everyone can add whatever toppings they want to their own personal dough. If you're grilling the dough inside on a grill pan, I let the grill pan warm up at one notch above medium (6; if you have numbers on your stove dials). For an outdoor grill, keep it on medium-low (you may need to adjust this as the heat on outdoor grills vary). Using a basting brush or a spoon, spread a thin even coat of olive oil on one side of the dough. Place the dough oil side down on the grill. Apply a thin coat of olive oil to the side of the dough facing up. Let the dough cook 5-6 minutes or until desired level of doneness. Carefully, flip the dough over and cook on the second side. While the second side is cooking, begin adding your toppings. I like to add the toppings before adding the cheese because the cheese will help hold them down. Once you've added the cheese and the crust is done to your liking, remove the pizza from the grill pan and onto a baking sheet. Place under the broiler until cheese is melted. For the outdoor grill, once the cheese is on and the crust done, turn off one side of the grill, slide the pizza over to that side and close the lid. The cheese will then melt without burning the crust. You may find that you at this point you need to turn up the heat on the grill slightly to help the cheese melt faster. Once the pizza is out of the oven or off of the grill, allow to cool 5-10 minutes before slicing.
This is one of my favorite things to cook with Matt. We always have a great time having our own little pizza parties! :) I hope you try this out and I'd love to hear what you think! Enjoy!


 I know some of you may be thinking that turkey meatballs is just plain wrong, but let me tell you that there was nothing wrong about my turkey florentine meatballs. When I thought of this recipe, it was not to replace ground beef meatballs, but to make up a different kind of meatball. And I do believe that the ground beef meatball has met its match! :) If you have an aversion to ground poultry, I hope you can look past the ground turkey and give this a try because I think that you will really enjoy these meatballs. Here's what I did...
-1/2 lb of ground turkey (I suggest getting the 93/7 because you need a little fat in the meatball or it will come out dry. This amount made 6 meatballs which were a little bigger than a golf ball.)
-a small handful of spinach, thinly sliced
-4 to 6 large basil leaves, thinly sliced
-a small handful of flat leaf (Italian) parsley, finely chopped
-1/2 of a small onion (or 1 large shallot), diced and sauteed until softened
-1/3 cup of shredded parmesan
-about 1/2 cup of plain breadcrumbs (just eyeball it, add a little less to begin with, you can always add more later if it's not holding together)
-1 egg
-salt and pepper as desired
-bocconcini (AKA small mozzarella balls. If you can't find these you can always get the large ball of mozzarella and cut it into bite sizes pieces.)
-pasta of your choice
-red sauce of your choice
Preheat the oven to 375 degrees.
In a mixing bowl, combine the spinach, basil, parsley, sauteed onion, parmesan, breadcrumbs, egg, and salt and pepper to taste. Add salt and pepper to the ground turkey separately to ensure that the meat is properly seasoned. Combine the ground turkey with the spinach mixture until all the ingredients are evenly distributed throughout the ground turkey. Be careful not to overmix or the meat will get tough. Take a small amount of the mixture (a little larger than a ping pong ball) and form into a patty. Place a bocconcini into the middle of the patty and with another small amount of the ground turkey mixture, begin forming the meat around the ball of mozzarella. Be sure to seal the edges where the meat comes together (just pinch them together) to make sure that the mozzarella doesn't seep out while cooking. (At this point, place the water on to boil for the pasta.) Once you have made all of the meatballs, heat a tablespoon of olive oil (just eyeball it) in a saute pan over medium heat. Place the meatballs in the pan and brown on each side for 1-2 minutes. (At this stage, we're not looking to cook the meatballs, we just want a good caramelization on them.) Once the meatballs are browned, transfer to a cookie sheet and place them in the oven. Cook the meatballs for about 12-14 minutes. Drop the pasta into the boiling water and cook for about 10 minutes for al dente pasta. Warm up the red sauce in a sauce pot. To serve, mix the pasta and sauce together, then pile it up high on the plate. Nestle in 2 meatballs, add some sauce on top of the meatballs and sprinkle the entire heap with some parmesan cheese.
These meatballs are moist and full of flavor! When you cut into one and reach that center of cheesy goodness, it's like a party in your mouth! I really hope that you try this and please tell me what you think of them! Enjoy!

 This is Matt's favorite meatloaf that I make. He insisted that I make it so that I could put it on my blog for all of you. Meatloaf seems to be growing on me the more I play around with it. There are so many flavor combinations you can create. The rich flavors of the A1 and bleu cheese really dress up the flavor of the ground beef. I know that there are some of you that don't like chunks of bleu cheese, but when you cook this meatloaf, the chunks of bleu cheese melt into gooey pockets of cheesy goodness. So, if you enjoy the flavor of bleu cheese, but not chunks of bleu cheese, I still think you will enjoy this. But if you don't think you will like it with the bleu cheese, feel free to leave it out. :) Here's what I did...
-1/2 lb of ground beef (I use 80/20 or 85/15, it makes for a more moist meatloaf.)
-1/2 cup of A1 steak sauce
-2/3 cup of bleu cheese crumbles
-about 1/2 cup of plain breadcrumbs (always start with a little less, then you can add more if needed.)
-1 egg, beaten
-3 scallions, chopped (If you don't have scallions, use any other onion you have on hand; shallots, white or red onion will all be good in this. Just make sure to saute it in olive oil until softened, then allow to cool before adding it to the meatloaf.)
-a small handful of flat leaf (Italian) parsley, chopped
-a heavy splash of Worcestershire sauce
a heavy sprinkle of steak seasoning (like Montreal's brand. If you don't have that, just use salt and pepper.)
Preheat the oven to 350 degrees.
In a large mixing bowl, add the ground beef and season with the Worcestershire sauce and steak seasoning. Add the remaining ingredients. Combine the mixture using your hands until all of the ingredients are evenly distributed throughout the ground beef. Shape into a flattened oval and place into a 9x5 inch loaf pan. Cook for 35-40 minutes. When it's finished, allow to cool for 5-10 minutes before slicing.
As a side dish, I served my Ranch Potatoes. Here's the recipe for those...
-small potatoes, cut in half horizontally (Fingerling or Baby Yukon Gold's. Use as many as you need for your family.)
Season with salt and pepper and drizzle with olive oil. Roast in the oven at 350 for about 20 minutes or until fork tender. Allow to cool 5-10 minutes before adding the dressing.
For the dressing:
-1 cup sour cream
-1 scallion, sliced thinly
-1 rounded TBS of chopped flat leaf parsley
-1 rounded TBS chopped fresh dill
-a light sprinkle of celery seed
-the juice from 1/2 of a lemon
-salt and pepper to taste
Combine ingredients in a bowl and adjust the seasoning to suit your taste. Add desired amount to the potatoes and stir to combine.
The Ranch Potatoes were a huge hit with us! I really like that I now have a recipe for ranch dressing from scratch! It will be great for a dip or to add into mashed potatoes, baked potatoes or salad. I hope you enjoy these recipes!
 Lately, I've been craving something my dad made for me when I was little. It's a simple thing, but it's one of those things that warms me up physically and emotionally. I'm not sure where he came up with it...knowing him, he probably made it up right there in front of me as I was sitting at the kitchen table. :) But even as I ate it this morning, I could close my eyes and be right back in my house in Kansas, sitting at the kitchen table, happily slurping this up. All he did was take leftover white rice, a spoonful of brown sugar and some milk and warmed it up in the microwave. Sounds simple, but it's wonderful! Since I didn't have any leftover rice, I just made some fresh this morning. Then I just stirred in the brown sugar and milk and a little cinnamon. Sliced banana would be good in it too, but I didn't think about that at the time. I have my own recipes that I love cooking, but my all-time favorite recipes are from my childhood...recipes that my mom and dad made, that can take me back to when I was a kid with just one bite.


